 Evan Shortiss
Pi-hole Ad Blocking Setup with Raspberri-Pi and Docker
My previous blog post detailed the steps I used to resurrect my neglected Raspberry Pi. In this blog post I’m going to cover how I setup Pi-hole for my home network.
Working at Red Hat means I deal with Docker and containers on a daily basis, and am pretty comfortable working with them. I also appreciate the fact that they typically save me the hassle of dealing with versioning issues and changing configurations in my host environment. As a result of this experience I chose to setup Pi-hole using Docker and think you should too.
Getting Started with Docker
Install Docker on your Pi by issuing the following commands:
# This can take a few minutes. Maybe go make tea or something?
curl https://get.docker.com/ | sh

# Enable the docker daemon and start it
sudo systemctl enable docker
sudo systemctl start docker

# Add your user to the docker group
sudo usermod -aG docker $(whoami)
Restart the session by running source ~/.bashrc to apply these new settings
, then run docker version to verify the install was successful - you should
see Docker Client and Server information.
Start Pi-hole
The fantastic people that contribute to the Pi-hole project provide a ready made docker_run.sh file that you can use to get started quickly. You can download this file to your home directory like so:
curl https://raw.githubusercontent.com/pi-hole/docker-pi-hole/master/docker_run.sh > ~/pihole-run.sh
Make the script executable by running chmod +x ~/pihole-run.sh. Next modify
the file using vi or nano. I made the following changes:
- Set
DNS1environment variable to the CloudFlare1.1.1.1DNS server. The default is Google’s8.8.8.8. - Set
DNS2environment variable to the CloudFlare1.0.0.1DNS server. The default is Google’s8.8.4.4. - Updated the
TZenvironment variable with my timezone.
I’ve included my pihole-run.sh file below for reference.
#!/bin/bash

# https://github.com/pi-hole/docker-pi-hole/blob/master/README.md

docker run -d \
    --name pihole \
    -p 53:53/tcp -p 53:53/udp \
    -p 80:80 \
    -p 443:443 \
    -e DNS1="1.1.1.1" \
    -e DNS2="1.0.0.1" \
    -e TZ="America/Los_Angeles" \
    -v "$(pwd)/etc-pihole/:/etc/pihole/" \
    -v "$(pwd)/etc-dnsmasq.d/:/etc/dnsmasq.d/" \
    --dns=127.0.0.1 --dns=1.1.1.1 \
    --restart=unless-stopped \
    pihole/pihole:latest

printf 'Starting up pihole container '
for i in $(seq 1 30); do
    if [ "$(docker inspect -f "" pihole)" == "healthy" ] ; then
        printf ' OK'
        echo -e "\n$(docker logs pihole 2> /dev/null | grep 'password:') for your pi-hole: https://${IP}/admin/"
        exit 0
    else
        sleep 3
        printf '.'
    fi

    if [ $i -eq 20 ] ; then
        echo -e "\nTimed out waiting for Pi-hole start, consult check your container logs for more info (\`docker logs pihole\`)"
        exit 1
    fi
done;
Run the pihole-run.sh and wait for it to start. It will print out a password
for the admin panel of the Pi-hole - take note of it for later.
If the start up fails try using docker logs pihole -f to see the error. If the final output is just a list of Target and Status it means the startup is just slow and you need to wait for those checks to complete. You can run docker logs pihole | grep password to get your password once it’s ready.
Note: if you delete the pihole container using docker rm -f pihole and run pihole-run.sh again it will reuse the configuration files at the locations specified by the volume flags (-v) in the start script. Delete those folders if you want a clean restart.
Update DNS Settings
This is specific for each router or device and is up to personal preference. I chose to set the Pi as my DNS server in my router so all devices in my apartment will benefit from the Pi-hole so long as the use the DHCP provided settings from my router.
If you don’t know your router IP run ip route | grep default on the Pi. The
output is similar to this:
default via <ROUTER_IP> dev wlan0 proto dhcp src <PI_IP> metric 303
Enter the value found at ROUTER_IP in your browser and login to do the
following:
- Reserve an IP Address for the Pi (you want to the Pi to have a fixed IP address since if it changes other devices will have no DNS!)
- Set the Pi IP as the DNS server that the router assigns to devices connecting using DHCP (probably most of your devices unless you’re a networking geek)
Below you can see I reserved specific IP addresses for my Pi and other devices, and I set the Pi address as the default DNS server for my home network.
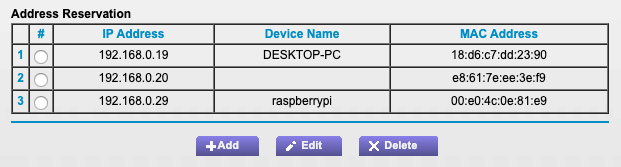
Reserved IP Address for Devices
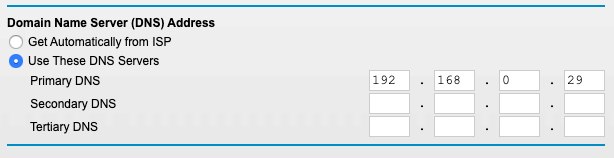
Setting the Pi as my DNS Server
Verify DNS Settings
To verify devices on your network are using the Pi-hole for DNS lookups try doing the following on your Raspberry Pi or a Mac/Linux laptop:
# perform a DNS lookup and verify your pi IP is the lookup server
nslookup google.com
Server:		192.168.0.29
Address:	192.168.0.29#53

Non-authoritative answer:
Name:	google.com
Address: 216.58.194.174
Name:	google.com
Address: 2607:f8b0:4005:808::200e
Note: If nslookup is not available run `sudo apt-get install dnsutils
Notice how my Pi’s IP address is listed as the DNS server being used.
Adding Blocklists via the Admin Panel
This final step is optional, but why the hell would you not want to beef up your defenses?
- Navigate to the IP Address of your Pi-hole in a web browser that’s connected
to the same network and visit the admin route, e.g
192.168.0.29/admin. - Login using the password that was printed in the docker logs when you started Pi-hole.
- Select the Settings on the left after logging in.
- Navigate to the Blocklists tab.
- Copy the lists you’d like from firebog.net into the textbox. Personally I added all of them and whitelist anything I run into issues with.
- Click Save and Update
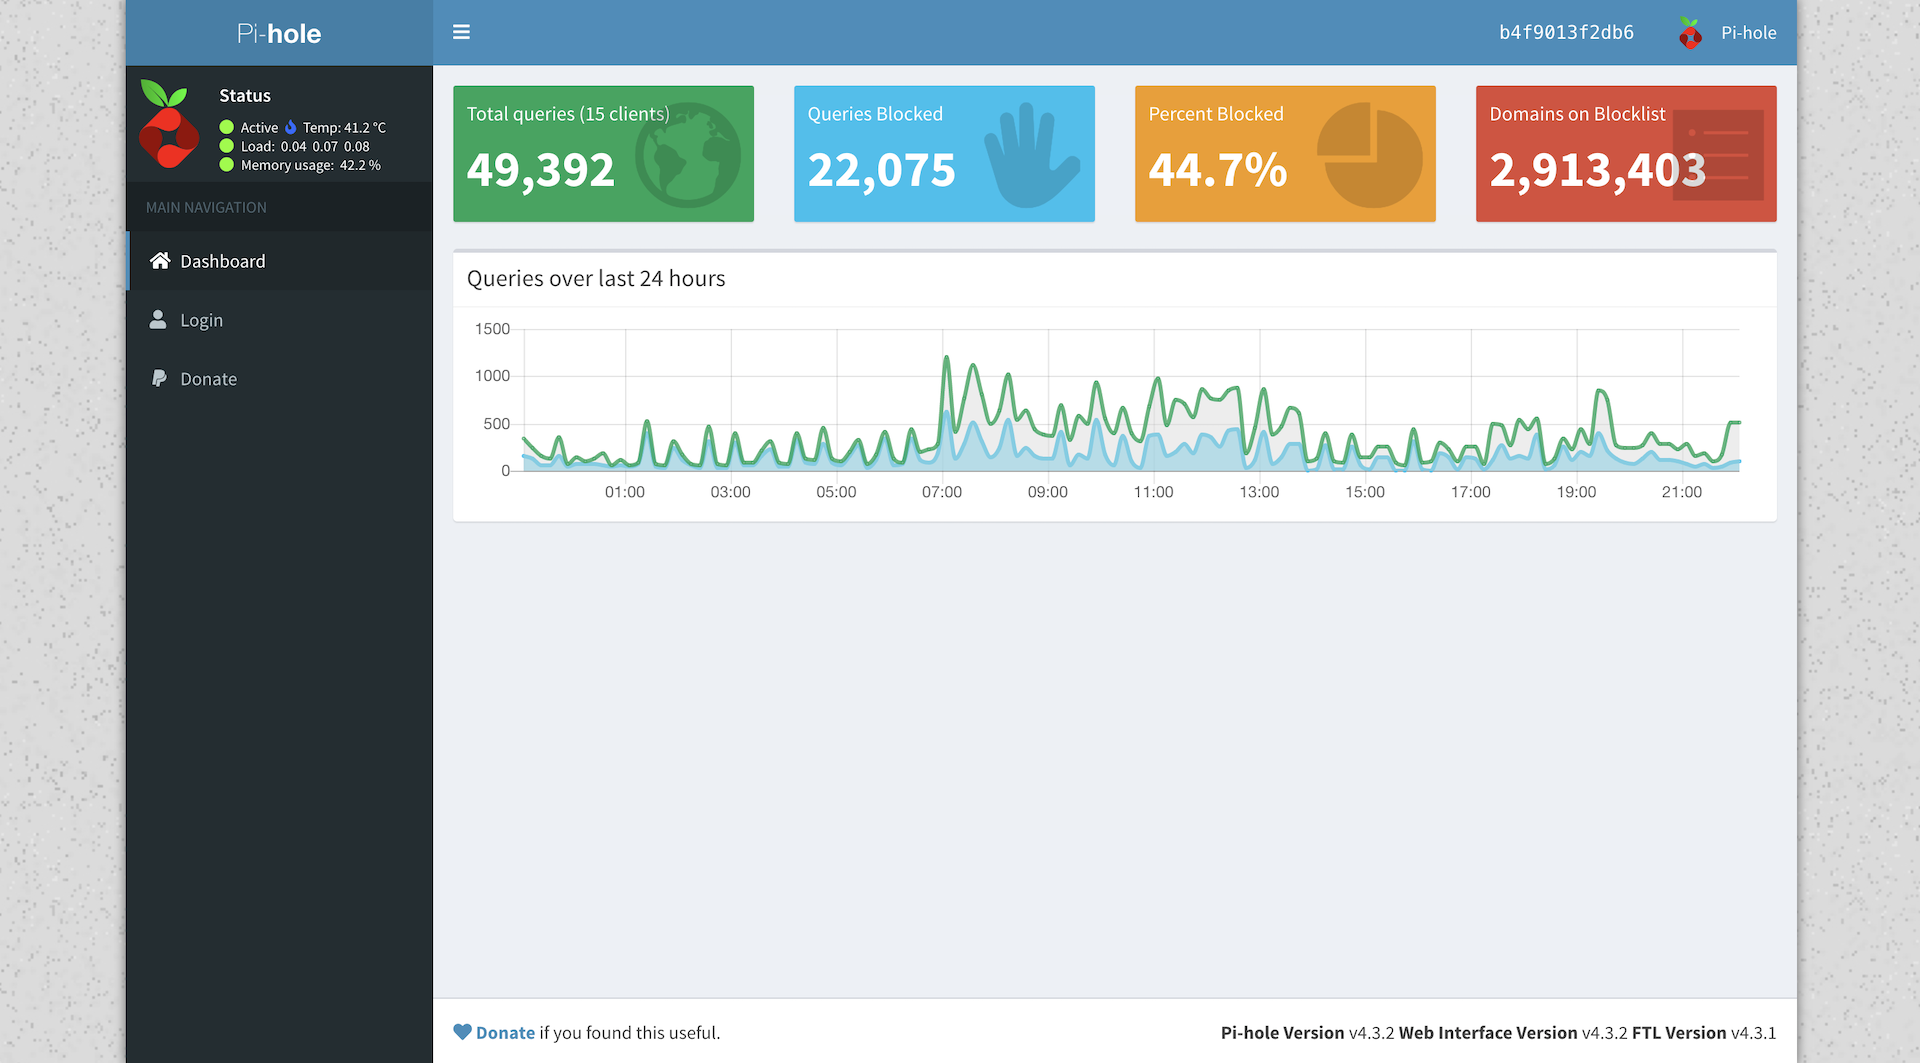
Over time you will be able to use the Pi-hole admin Dashboard screen to see the DNS queries occurring on your network and how many your Pi-hole has blocked.
You can also use the Whitelist section in the Settings to add items you feel
should resolve. For example, I added events.gfe.nvidia.com since it was
spamming a large amount of DNS lookups due to what I assume is aggressive bit
of retry coding by nVidia’s GeForce Experience team when DNS lookups failed.
Here’s what my dashboard looks like after a few days running Pi-hole.